
- Looking at the Business
- Why Build a Custom Widget?
- The Example Code
- Introducing Acuity Scheduling
- Getting Set Up
- Starting with the Implementation
- One Step at a Time
- Initializing the Data
- Finding an Available Day
- Finding an Available Time
- Making the Booking
- What’s Next?
- Rounding Up
- Frequently Asked Questions about Modernizing a Driving Instructor’s Booking System
 The code for this tutorial is available on GitHub.
Looking at the Business
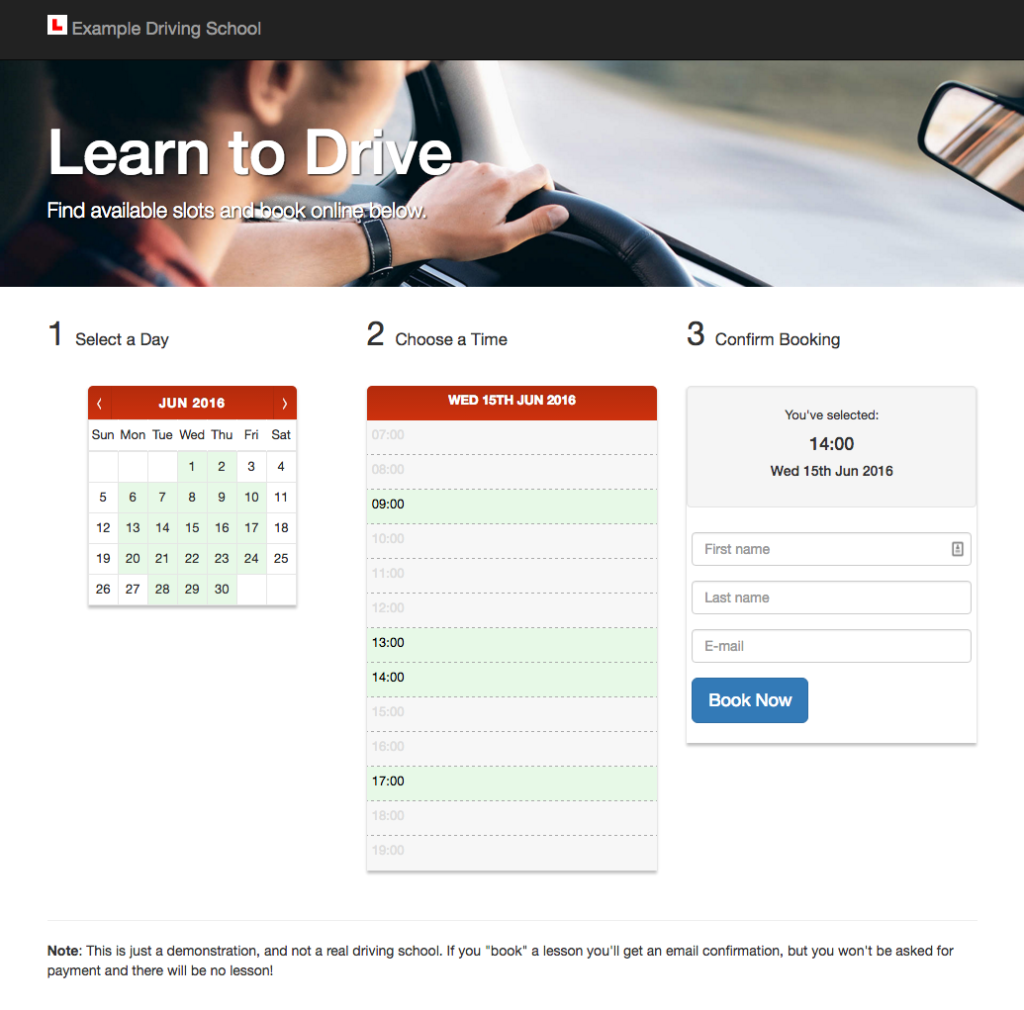
Before we delve into the implementation, let’s look a little closer at the business of operating as a driving instructor. A driving instructor, of course, has a number of “slots” available in a given day. Driving lessons are, by their very nature, one-to-one, which simplifies things for us a little. In order to keep things relatively simple, we’ll gloss over certain practicalities. For example, in the real world it would be impossible to begin a lesson at one side of a given city at 3pm, when another finished moments earlier on the other side of the city. Our availability widget will display a calendar for a given month — defaulting to the current one — which shows, at a glance, which days have some availability. If a user clicks on a specific day, it’ll drill down and display the time slots which are available for that day. We’ll do this using some of the latest front-end technologies, making our widget highly responsive.Why Build a Custom Widget?
There are a number of possible reasons why you might decide to build a custom widget, for example:- You can style it so that it matches the design of your site seamlessly
- You can use whatever front and back-end technologies you already have in place
- A custom widget might be the most appropriate solution if you’d prefer to take payments yourself
- You can keep people on your site as they complete the scheduling process
The Example Code
The code which accompanies this tutorial is available on GitHub. For brevity, we won’t cover all of the code here, so you’ll need to grab a copy regardless of whether you code along, or simply read through as you go. The example includes a PHP back-end along with the booking widget; we’ll see in a moment why we need a server-side component. The simplest way to run the example is to use PHP’s built-in web server. Simplycd into the public directory and enter the following command, substituting the port number if required:
php -S localhost:8000Introducing Acuity Scheduling
Acuity Scheduling is an online service for managing and scheduling appointments. In the context of our driving instructor, an appointment is a driving lesson, but its applications are far broader. One of Acuity’s key features is the ability to provide real-time availability information. We can grab that information using the API, to embed into our driving instructor’s website, and then use that as the basis of our scheduling widget. Acuity offers a whole host of other features, including the ability to take online payments, to manage clients, send e-mail and text message reminders, and much more.The Acuity Scheduling API
We’re going to integrate with Acuity using their API. In particular, we’ll use three endpoints:GET /availability/dates gives us a list of dates belonging to a specified month which have one or more available time slots.
GET /availability/times provides a list of available times for a specified day.
POST /appointments is used to actually create (in other words, book) an appointment.
Together, the first two endpoints provide enough information for the end-user to see at a glance what’s available, so that they can choose a suitable slot. Once we have an available date and time, we can collect some information from the learner and make an appointment for them.
Authentication
The Acuity API provides two methods of authentication: OAuth2 and basic HTTP authentication. The former is only really applicable when you’re dealing with multiple Acuity users. For our purposes it’s probably overkill. To use basic HTTP authentication, however, we’re going to need to proxy the API calls through our back-end. The reason for this is simple. Basic HTTP authentication requires a username and password that, were we to call the API directly from our JavaScript code, would be exposed. When using the Acuity API the username and password are your user ID and API key respectively, but the principle is exactly the same. This poses an obvious security risk. The key part of the server-side code for determining availability, which you’ll find in the repository which accompanies this article, is the following:
$app->get( 'api/availability/{period}', function( Request $request, $period ) use ( $app ) {

    // Build the URL, incorporating the `appointmentTypeID`.
    $query = $request->query->all( ) + [ 'appointmentTypeID' => $app[ 'appointmentTypeID' ] ];
    $url = sprintf( '/availability/%s?%s', $period, http_build_query( $query ) );

    // Make the request...
    $response = $app[ 'client' ]->request( $url );

    // If there's an error, write it to the log
    if ( $response[ 'status_code' ] !== 200 ) {
        $app[ 'logger' ]->error( $response[ 'message' ] );
    }

    // ... and simply return it
    return json_encode( $response );

} )
->assert( 'period', 'dates|times');
/availability/dates or /availability/times — complete with query parameters — to the Acuity Scheduling API, and returning the results in JSON format. It’s also merging in the appointment type ID, which basically tells Acuity what it is we’re trying to find availability for.
This way, we can keep our API Key — which acts as a password — safely on the server, without exposing it in our client-side code.
If you don’t want to use PHP, you don’t have to. There’s an official SDK for Node.js, or if you’re using something else then it ought to be straightforward to call the API from your programming language of choice. Refer to the documentation for more information.
Without further ado, let’s get started.
Getting Set Up
In order to work through this tutorial, you’ll need an account with Acuity Scheduling. Head over to the website to sign up, which only takes a couple of minutes. The 14-day free trial will work just fine for the purposes of this tutorial, so it needn’t cost you a penny. Once you have an account, you’ll need to set up a new appointment type. For the purposes of this tutorial that’s pretty straightforward — we’ve only got one type of appointment, and that’s a driving lesson. While logged into Acuity, go to Business Settings > Appointment Types and click New Type of Service, then fill out the required information. It’s probably simplest to keep the duration at one hour, which is probably what you’d expect for a driving lesson. There’s additional help if you need it. If you click on your new appointment type and take a look at the URL, you’ll see that it includes a unique ID. Make a note of this because you’ll need to add it to the configuration file in a moment.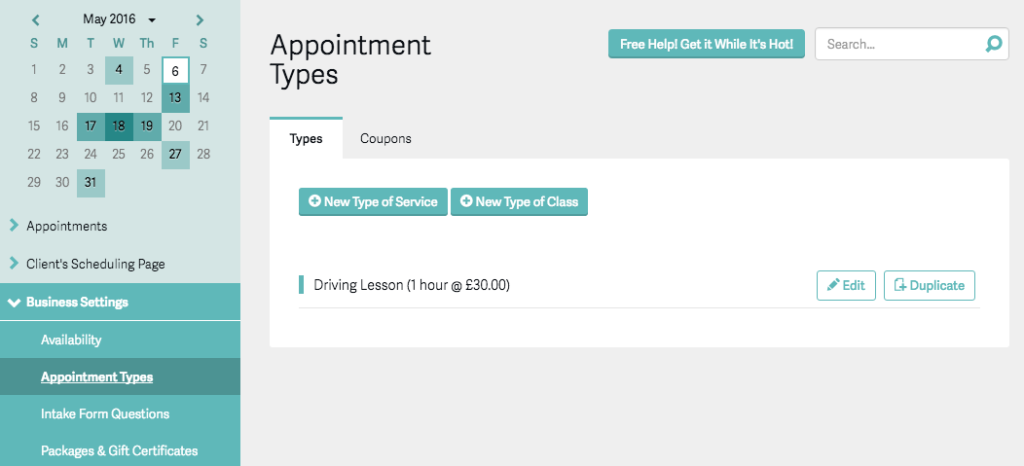 Your next step should be to set your availability. This is essentially where you define your working hours, whether a regular Monday to Friday 9–6, or something a little more irregular. You can do this by selecting Availability under Business Settings.
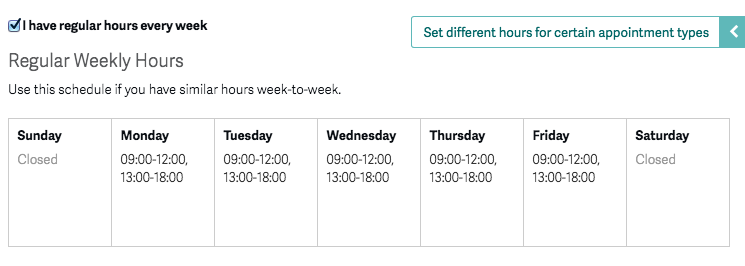
For the purposes of the example widget we’re building, it’s probably easiest if you set your hours as 9–6, leaving a break for lunch.
The screenshot below shows an example of the working hours set to 9–6pm, with an hour for lunch at 12.
Your next step should be to set your availability. This is essentially where you define your working hours, whether a regular Monday to Friday 9–6, or something a little more irregular. You can do this by selecting Availability under Business Settings.
For the purposes of the example widget we’re building, it’s probably easiest if you set your hours as 9–6, leaving a break for lunch.
The screenshot below shows an example of the working hours set to 9–6pm, with an hour for lunch at 12.
 Acuity will ensure that appointments fit within the working hours, so if you specify those as 9am–6pm, the last available slot for a one-hour lesson will be at 5pm. For a day that has all slots available, our widget will look like the screenshot below.
 The next step is to find out your API credentials. Go to Business Settings → Integrations, scroll to the bottom of the page and click ”View your API credentials”.
Now that you have the three pieces of required information — your user ID, API key and a new Appointment Type ID — it’s time to get that into a configuration file.
In the repository you’ll find a file named
The next step is to find out your API credentials. Go to Business Settings → Integrations, scroll to the bottom of the page and click ”View your API credentials”.
Now that you have the three pieces of required information — your user ID, API key and a new Appointment Type ID — it’s time to get that into a configuration file.
In the repository you’ll find a file named config/__COPY_ME__.json. Take a copy of it, naming it config/dev.json.
The dev part indicates that we’re working in a development environment. In production you’d probably call it production.json or similar.
Fill out this new configuration file, replacing the appropriate entries:
{
  "debug": true,
  "userId": "YOUR-USER-ID",
  "apiKey": "YOUR-API-KEY",
  "appointmentTypeID": "APPOINTMENT-TYPE-ID"
}
logs/error.log.
Starting with the Implementation
We’re going to use Vue.js to build the widget itself. In many ways, it’s like a stripped-down version of Angular, specifically for building reactive components. If you’d rather use something else, like Angular for example, then the general principles shouldn’t be all that different. We’ll also be using Moment.js to make working with dates and times much simpler, Vue Resource for communicating with our back-end and Vue Form for simple form validation. Install the dependencies:bower install vue moment vue-resource vue-form --saveviews/index.twig.html.
<!DOCTYPE html>
<html lang="en">
  <head>
    <meta charset="utf-8">
    <meta http-equiv="X-UA-Compatible" content="IE=edge">
    <meta name="viewport" content="width=device-width, initial-scale=1">

    <title>Book a Driving Lesson</title>

    <link rel="stylesheet" href="https://maxcdn.bootstrapcdn.com/bootstrap/3.3.6/css/bootstrap.min.css">
    <link rel="stylesheet" href="/assets/styles.css">

  </head>

  <body>

    <script src="/bower_components/moment/moment.js"></script>
    <script src="/bower_components/vue/dist/vue.js"></script>
    <script src="bower_components/vue-resource/dist/vue-resource.js"></script>
    <script src="/bower_components/vue-form/vue-form.js"></script>
    <script src="/assets/scripts.js"></script>

  </body>
</html>
public/assets/scripts.js will hold our widget definition, so let’s create the basic structure of that along with a couple of filters, which we’ll use to format dates and times.
Vue.http.options.root = '/api';

Vue.filter('time', function ( hour ) {
	if ( hour < 10 ) {
		return '0' + hour + ':00';
	}
	return hour + ':00';
});

Vue.filter('formatDateTime', function( day, format ) {
    if ( ! day ) {
        return '';
    }
    return day.format( format )
});

var widget = new Vue({
    el : '#availability-widget',
    data : {
    	// . . .
    },
    ready : function() {
      	// . . .
    },
    methods : {
      	// . . .
    }
});
- The data property is used to initialize our data. Specifying the properties here ensures that Vue.js performs the getter/setter process during initialization.
- The
ready()method will perform some initialisation. methodsis a hash of, as you might expect, methods; we’ll define a number of these to take the user from selecting a date to completing their booking.- You can grab a copy of the stylesheet from the repository, or build your own to match your website’s look and feel.
One Step at a Time
Our widget will comprise three “stages”:- The user selects a date with some availability on a mini-calendar.
- Having selected a date, they select a “slot” from those that are available.
- Once a date and time have been selected, we’ll show that back to the user for confirmation and take some basic information. Once they’ve provided that information, we can call the API to actually schedule the lesson.
<div id="availability-widget">
    <ol class="steps">
        <li class="col-md-4 active">
            <header>Select a Day</header>
        </li>
        <li class="col-md-4" v-bind:class="{ 'active' : day }">
            <header>Choose a Time</header>
        </li>
        <li class="col-md-4" v-bind:class="{ 'active' : time }">
            <header>Confirm Booking</header>
        </li>
    </ol>
</div>
<div> with an ID of availability-widget. This matches the el property in our widget code, which means that Vue will bind itself to it in order to implement our widget.
We’ll add the markup for each steps shortly, but for now note that we’re using a class of active to indicate progress; using v-bind we can “activate” the second step when the user has selected a day, and the third step when they’ve selected a time.
Initializing the Data
We’re going to maintain three separate data properties to help keep track of the process of “drilling down” to a specific date and time:monthdaytime
data : {
    today : moment(),
    weekdays : moment.weekdaysShort(),
    calendar : [],
    month : moment(),
    day : null,
    time : null,
    hours : [],
    bookingForm : {},
    learner : {
        firstName : null,
        lastName : null,
        email : null
    },
    bookingStatus : 'pending'
}
Finding an Available Day
The first part, then, is to call the Acuity API to find availability for a particular month and render a mini-calendar. When the component is initialised we’ll call it for the current month, but we’ll also need to allow users to navigate between months using the arrow in the calendar header. This is illustrated in the screenshot below.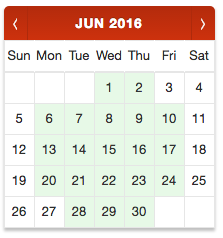 Let’s start with the HTML:
<li class="col-md-4 active">
    <header>Select a Day</header>
    <div class="cal">
        <div class="header">
            <span class="left button" id="prev" v-on:click="previousMonth" v-if="!month.isSame(today, 'month')"> ⟨ </span>
            <span class="month-year" id="label"> {{ month | formatDateTime 'MMM YYYY' }} </span>
            <span class="right button" id="next" v-on:click="nextMonth"> ⟩ </span>
        </div>
        <table id="days">
            <tr>
                <td v-for="weekday in weekdays">{{ weekday }}</td>
            </tr>
        </table>
        <div class="cal-frame" v-if="calendar.length">
            <table class="curr">
                <tr v-for="row in calendar">
                    <td v-for="day in row" v-bind:class="{ 'nil' : !day.d, 'today' : day.today, 'past' : day.past, 'available' : day.available }" v-on:click="selectDay(day.d)">{{ day.d }}</td>
                </tr>
            </table>
        </div>
	    <div class="loading" v-if="!calendar.length">
			<p><img src="/assets/ajax-loader.gif"></p>
			<p>Loading dates...</p>
	    </div>
    </div>
</li>
- An empty cell, used to pad it out into a tabular structure.
- A day in the past.
- The current day.
- A day with availability.
- A day with no availability.
selectDay(). We’ll implement that in the next section; but first, we need to populate and build the calendar.
So, we’ll need to get the availability for a given month. Here’s what the output from /availability/dates will look like:
[
  {
    "date": "2016-06-02"
  },
  {
    "date": "2016-06-06"
  },
  ...
}
methods part of the widget:
methods : {

    /**
     * Fetch the availability data for a given month
     */
    getAvailabilityForMonth : function( ) {

        this.calendar = [];

        this.$http.get( 'availability/dates', { month : this.month.format( 'YYYY-MM' ) } ).then( function( response ) {

            this.days = [];

            var available = response.data.map( function( item ) {
                return moment( item.date ).date( );
            });

            var temp = moment( this.month ).date( 1 );
            var m = temp.month();
            var now = moment();

            do {
                this.days.push({
                    d : temp.date(),
                    past : temp.isBefore( now, 'day' ),
                    today : temp.isSame( now, 'day' ),
                    available : ( available.indexOf( temp.date() ) > -1 ),
                });
                temp.add( 1, 'day' );
            } while ( temp.month() == m );

            this.buildCalendar();

        });
    },

    // . . .
}
buildCalendar().
Remember that we want to load the current month’s availability when the component is initialized. We can do this in the ready section:
var widget = new Vue({
    // . . .
    ready: function() {
      this.getAvailabilityForMonth();
    },
    // . . .
 });
previousMonth : function() {
    var current = this.month;
    this.$set( 'month', null )
    this.$set( 'month', current.subtract( 1, 'months' ) );
    this.getAvailabilityForMonth();
},

nextMonth : function() {
    var current = this.month;
    this.$set( 'month', null )
    this.$set( 'month', current.add( 1, 'months' ) );
    this.getAvailabilityForMonth();
},
Finding an Available Time
At this point, we have a specific day which we know has at least one available slot. The next step, then, is to list those slots and allow the learner to choose one. A reminder of what this section of the widget will look like is shown in the screenshot below. You’ll recall that clicking a day on the calendar calls the
 selectDay() method, which will in turn find out the availability for that specific day.
Before we implement that, here’s what the output from /availability/times will look like:
[
  {
    "time": "2016-06-02T13:00:00-0800"
  },
  {
    "time": "2016-06-04T14:00:00-0800"
  },
  ...
}
var available = response.data.map( function( item ) {
    return moment( item.time ).hour( );
});
for ( var h = 7; h  -1 )
    });
}
selectDay() method in full:
selectDay : function( d ) {
    if ( d ) {
        // Create am instance
        var day = moment( this.month ).date ( d );

        // If it's in the past, exit
        if ( day.isBefore( moment(), 'day' ) ) {
            return;
        }

        this.day = day;
        this.hours = [];

        this.$http.get( 'availability/times', { date : this.day.format( 'YYYY-MM-DD' ) } ).then( function( response ) {

            var available = response.data.map( function( item ) {
                return moment( item.time ).hour( );
            });

            for ( var h = 7; h  -1 )
                });
            }

        });

        this.time = null;
    }
},
<li class="col-md-4" v-bind:class="{ 'active' : day }">
	<header>Choose a Time</header>
	<ol class="times" v-if="day">
		<li class="header">
			{{ day | formatDateTime 'ddd Do MMM YYYY' }}
		</li>
		<li v-for="hour in hours" v-bind:class="{ 'available' : hour.available }" v-on:click="selectTime( hour )">
			<div class="hour">{{ hour.h | time }}</div>
		</li>
	</ol>
	<div class="loading" v-if="day && !hours.length">
		<p><img src="/assets/ajax-loader.gif"></p>
		<p>Loading times...</p>
	</div>
</li>
selectTime() method, which we’ll use to proceed to the booking stage.
Finally, we need to implement the selectTime() method, which is actually really straightforward:
selectTime : function( hour ) {
    if ( hour.available ) {
        this.time = moment( this.day ).hours( hour.h ).minutes( 0 ).seconds( 0 );
    }
}
Making the Booking
We’re now at the point where we have a specific time slot, so it’s time to implement the booking process. The learner will be required to provide some personal information. By default the following three fields are required:- The learner’s first name
- The learner’s last name
- Their e-mail address
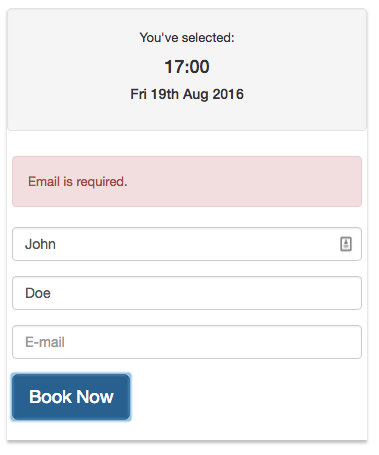 Let’s build the HTML:
<li class="col-md-4" v-bind:class="{ 'active' : time }">
<header>Confirm Booking</header>
<div v-if="time" class="book">
<header class="well">
<p>You've selected:</p>
<h4>{{ time | formatDateTime 'HH:mm' }}</h4>
<h5>{{ time | formatDateTime 'ddd Do MMM YYYY' }}</h5>
</header>
<form v-form name="bookingForm" v-on:submit.prevent="confirm" v-if="bookingStatus == 'pending'">
<fieldset>
<div class="alert alert-danger" v-if="bookingForm.$submitted && !bookingForm.$valid">
<p v-if="bookingForm.firstName.$error.required">First name is required.</p>
<p v-if="bookingForm.lastName.$error.required">Last name is required.</p>
<p v-if="bookingForm.email.$error.required">Email is required.</p>
<p v-if="bookingForm.email.$error.email">Email is not valid.</p>
</div>
<div class="form-group">
<input type="text" name="firstName" placeholder="First name" class="form-control" v-model="learner.firstName" v-form-ctrl required>
</div>
<div class="form-group">
<input type="text" name="lastName" placeholder="Last name" class="form-control" v-model="learner.lastName" v-form-ctrl required>
</div>
<div class="form-group">
<input type="email" name="email" placeholder="E-mail" class="form-control" v-model="learner.email" v-form-ctrl required>
</div>
<div class="form-group">
<button type="submit" class="btn btn-lg btn-primary">Book Now</button>
</div>
</fieldset>
</form>
<div class="loading" v-if="bookingStatus == 'sending'">
<p><img src="/assets/ajax-loader.gif"></p>
<p>Making booking...</p>
</div>
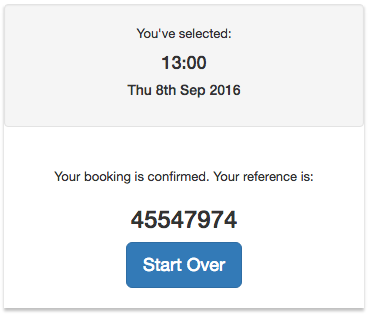
<div class="confirmed" v-if="bookingStatus == 'confirmed'">
<p>Your booking is confirmed. Your reference is:</p>
<h3>{{ booking.id }}</h3>
<footer>
<button class="btn btn-lg btn-primary" v-on:click="reset">Start Over</button>
</footer>
</div>
</div>
</li>
learner property.
A big chunk of the markup is responsible for validation. In the example, I’m using Vue Form to validate the form. I won’t cover the details of how that has been put together, but you may like to refer to the code or the documentation for more information.
The <div> with the class confirmed will be displayed when a booking has been made, and will simply show the booking ID we get back from Acuity.
Here is the code for making the booking:
confirm : function() {
    if ( this.bookingForm.$valid ) {
        this.bookingStatus = 'sending';

        var data = this.learner;
        data.datetime = this.time.format();

        this.$http.post( 'appointments', data ).then( function( response ) {
            this.booking = response.data;
            this.bookingStatus = 'confirmed';
        });
    }
}
bookingStatus property so that the widget can keep the user informed as to what’s going on. When the booking property is set it’ll trigger the confirmation section to be displayed with the booking ID.
For reference, here is the PHP code for making the appointment:
/**
 * Acts as a proxy to `/appointments`
 * We can use this to actually make an appointment
 */
$app->post( 'api/appointments', function( Request $request ) use ( $app ) {

    // Build the data by decoding the JSON and then injecting the `appointmentTypeID`.
    $data = json_decode( $request->getContent(), true ) + [ 'appointmentTypeID' => $app[ 'appointmentTypeID' ] ];

    // Make the request...
    $response = $app[ 'client' ]->request(
        '/appointments',
        [
            'method'    =>  'POST',
            'data'      =>  $data,
        ]
    );

    // If there's an error, write it to the log
    if ( $response[ 'status_code' ] !== 200 ) {
        $app[ 'logger' ]->error( $response[ 'message' ] );
    }

    // ...and return it
    return json_encode( $response );

});
 That’s it, we’re done!
What’s Next?
Okay, so now you have a booking widget in place, using Acuity Scheduling to manage the bookings and scheduling. What else can you do with it? Let’s take a brief look at a couple of additional (and entirely optional) features that can enhance the experience for both learner and instructor even further.Accepting Payments
We’re allowing anyone to schedule a lesson on the assumption they’ll pay for it on the day, but Acuity also offer the ability to make the payment in advance online. Check out the documentation for more information.Third-party Integrations
There are a number of options for integrating with other services, whether that be for accounting purposes (Quickbooks, Freshbooks), CRM (Salesforce, Zoho), or bulk e-mailing (AWeber, Mailchimp). It also integrates nicely with Zapier, opening up a huge range of possibilities. You can also work with your existing calendar solution (Google Calendar, Outlook) or simply import or export using the.ics file format.
Webhooks
Acuity also provides webhooks, so that you can create your own custom actions when appointments are scheduled, canceled or re-scheduled.Rounding Up
We’ve covered a lot of ground, but during the course of this tutorial we’ve not just modernized our driving instructor’s website, but potentially revolutionized the way they manage bookings. Everybody wins! Want to learn more? Find out how to build a cookery class booking system with Acuity Scheduling, PHP and Lumen.Frequently Asked Questions about Modernizing a Driving Instructor’s Booking System
How does Acuity Scheduling improve the efficiency of a driving instructor’s booking system?
Acuity Scheduling is a cloud-based appointment scheduling software that allows driving instructors to automate their booking process. It eliminates the need for manual scheduling and reduces the chances of double-booking or missed appointments. With Acuity, instructors can set their availability, and students can book their lessons online at their convenience. It also sends automated reminders to students, reducing no-shows. Moreover, it integrates with various payment gateways, allowing for secure and hassle-free payments.
Can I customize my scheduling page with Acuity Scheduling?
Yes, Acuity Scheduling offers a high level of customization. You can personalize your scheduling page to match your brand’s look and feel. You can add your logo, choose your color scheme, and even customize the text on your scheduling page. This helps in maintaining brand consistency and creating a professional image for your driving school.
How does Acuity Scheduling compare to other driving school scheduling software?
Acuity Scheduling stands out for its user-friendly interface, customization options, and robust features. It offers automated reminders, seamless payment integration, and the ability to sell packages and gift certificates. While other scheduling software may offer similar features, Acuity’s intuitive design and excellent customer support make it a preferred choice for many driving schools.
Is Acuity Scheduling suitable for small driving schools?
Absolutely. Acuity Scheduling is scalable and can cater to driving schools of all sizes. Its flexible pricing plans make it affordable for small businesses. Plus, it’s easy to set up and use, which is a big plus for small businesses that may not have dedicated IT support.
How secure is Acuity Scheduling?
Acuity Scheduling takes security seriously. It uses secure socket layer (SSL) technology to ensure that all data transferred between your web server and your visitors remains private and integral. It also complies with the General Data Protection Regulation (GDPR), ensuring the privacy and security of your students’ data.
Can I integrate Acuity Scheduling with other software?
Yes, Acuity Scheduling offers integrations with a wide range of software, including Google Calendar, Outlook, Zoom, and more. This allows you to streamline your operations and manage everything from one place.
Does Acuity Scheduling offer support?
Yes, Acuity Scheduling offers excellent customer support. They have a comprehensive help center with articles and tutorials to guide you. If you need further assistance, you can reach out to their support team via email.
Can I use Acuity Scheduling on my mobile device?
Yes, Acuity Scheduling has a mobile app available for both iOS and Android devices. This allows you to manage your schedule, accept bookings, and process payments on the go.
Can I offer packages or gift certificates with Acuity Scheduling?
Yes, with Acuity Scheduling, you can sell packages, gift certificates, and even subscriptions. This can help you attract more students and increase your revenue.
How does Acuity Scheduling handle cancellations and rescheduling?
Acuity Scheduling allows you to set your cancellation and rescheduling policies. You can specify how much notice is required for cancellations or rescheduling, and whether there are any fees associated. This helps in managing your schedule more efficiently and reduces last-minute cancellations.
 Lukas White
Lukas is a freelance web and mobile developer based in Manchester in the North of England. He's been developing in PHP since moving away from those early days in web development of using all manner of tools such as Java Server Pages, classic ASP and XML data islands, along with JavaScript - back when it really was JavaScript and Netscape ruled the roost. When he's not developing websites and mobile applications and complaining that this was all fields, Lukas likes to cook all manner of World foods.